

What is Azure Backup?
Azure backup is a service in azure which provides a simple, secure and cost-effective backup solution for virtual machines (Azure and On-premise), Azure file share, SAP HANA Databases in Azure VMs and SQL server on Azure VMs. Azure backup uses Azure site recovery vault for storing backup data using Azure storage accounts. Recovery vault uses local redundant storage (LRS) and Geo- redundant storage (GRS) for storing backup data. By default, backed up data in Azure stores in Geo-Redundant storage.
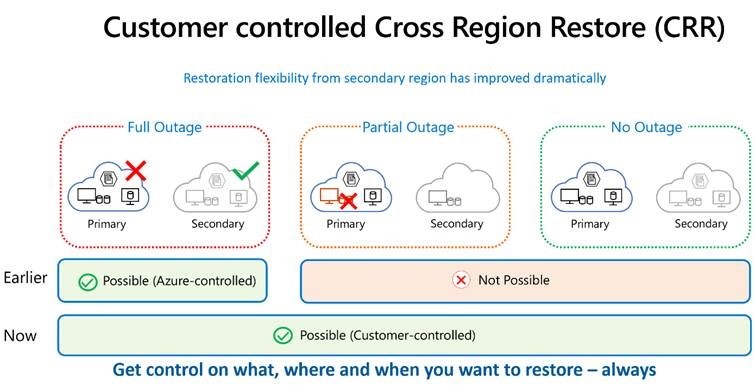
What is the Cross Region Restore feature?
On April 2020, Microsoft announced a new feature in azure backup known as “Cross Region Restore (CRR) for Azure Virtual Machines”. Backup uses GRS to store data in the primary and secondary region (Azure paired secondary region) for a higher level of durability of data when a primary region is not available.
Prior to CRR, the backup is made be available in the secondary region only when Azure declares the primary region as not available (disaster), meaning the backed-up data availability in the secondary region is controlled by Azure. With CRR, Azure backup leverages Read-Access Geo-Redundant storage (RA-GRS) to support restore in the secondary region at any time, granting control to the customer to restore their virtual machines to the secondary region at will.
Currently pricing for enabling Cross Region Restore on Recovery Services vault will remain the same as pricing for geo-redundant storage-based Recovery Services vault.
Cross Region Restore is now available in all Azure public regions. This feature is in Public Preview.
Assumptions
- You need to have valid subscriptions in Azure.
- The reader has knowledge on creating Azure resources (Virtual machine, network and Azure site recovery).
- Provisioning the mentioned resources will incur cost on your subscription.
LAB Demo setup:
In this blog setup, we will provision the below resources:
- Two Azure Resource groups for source VM and target VM restore replication in two different regions within Australia.
- Two virtual networks, one for actual workload and other for testing restore in two different regions within Australia. Secondary region virtual network to be unique.
- One windows Virtual machine placed in source resource group in one region.
- Azure Site Recovery for backup of virtual machine.
- One storage account for staging/cache disk in secondary region only.
How to enable CRR feature in Azure Backup:
Recovery Service vault enabled with geo-redundant storage settings will have the option to onboard to this feature.In this section we will create Azure site recovery and configure the CRR feature.
- From Azure portal, click create resource and search for Azure site recovery, select Backup and site recovery. Click create.
- Provide name (asr-test) and select region as Azure Australia East.
- Click review + create and once validation passes click create.
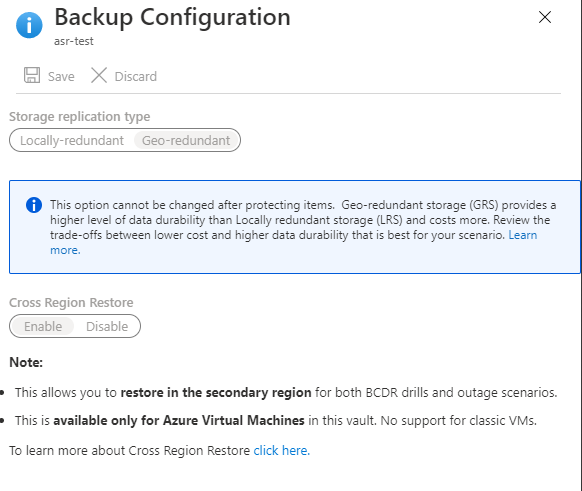
- Go to the Site recovery vault, which we created above. Select settings -> properties-> backup configuration and click update.
- Click Enable Cross Region Restore in this vault to enable the functionality and click save.
Azure VNET & Resource Group and Virtual machine configuration:
In this section, we will create the resource groups for testing, the source and destination virtual networks and the source virtual machine.
- Login to azure portal and select resource groups from home page, click “add” at top of page.
- Select your desired azure subscription, enter resource group name as “azure-demo” and select Australia East region.
- Click Review + Create and once validation passes click Create.
- Repeat the above steps for creating the target resource group with name “azure-dr-demo” in Australia South East region.
- From Azure portal home page, select “azure-demo” resource group. Click networking à virtual network and fill the required details:
- Subscription: select your desired subscription
- Resource group: select “azure-demo”, which we created for source resources.
- Name: provide “azure-demo-vnet”
- Location: Australia East.
- Click next and provide IP address space: 172.16.0.0/24.
- Select subnet and enter subnet name “workload” and subnet range as “172.16.0.0/24 “.
- Leave other settings as default and click Review + create and once validation passes click Create.
- Repeat steps from 5 to 8 to create another virtual network in resource group “azure-dr-demo”. Provide IP address space: 10.10.10.0/24 and location Australia South East.
- Create a source VM in “azure-demo” resource group on the “azure-demo-vnet” virtual network.
- From Azure portal home page, select “azure-demo” resource group. Click computeà virtual machine and fill the required details:
- Subscription: select your desired subscription
- Resource group: select “azure-demo”, which created for source resources.
- Name: provide “azdemo-vm01”
- Location: Australia East.
- Image: Windows server 2016 datacenter.
- Administrator account: Enter username
- Administrator password: enter your password & re-confirm. Please note down credentials for later use.
- Public inbound ports: allow selected ports. RDP (3389).
- Leave other settings as defaults.
- Note: Enabling RDP from public IP address is not recommended for production workloads.
- Click Next: disks, keep defaults.
- Click Next: networking.
- Virtual network: azure-demo-vnet
- Subnet: workload
- Public ip: create new. Enter name.
- NIC NSG: Basic
- Public inbound ports: allow selected ports. RDP (3389).
- Click Next: management. I turn off diagnostics and auto-shutdown for my testing workloads.
- Click Review + create and once validation passes click Create.
- From Azure portal home page, select “azure-dr-demo” resource group. Click storage à storage accounts and fill the required details:
- Subscription: select your desired subscription
- Resource group: select “azure-dr-demo”, which we created for restore resources.
- Name: provide “azdemocache”
- Location: Australia South East.
- Leave other fields as defaults.
- Click Review + create and once validation passes click Create
Create a file on virtual machine:
In this section, we will create a simple file on the server for testing the virtual machine after failover to another region.
- Login to the created virtual machine via RDP using the public ip and provide credentials.
- Create a simple text file and place it on C: \drive, name file as “backup.txt”
Enable Backup on virtual machine:
In this section we will create Azure site recovery and enable backup of the virtual machine.
- From Azure portal, click virtual machines and select the VM created earlier “azdemo-vm01”.
- From VM operation blade, select backup and provide these settings:
- Recovery services vault: click select existing and select “asr-test”
- Backup policy: default policy, or you can create a new policy based on your requirement.
- Click enable backup. Wait a few minutes until the job completes.
- After enabling backup, we can run backup immediately or wait for policy scheduled time.
- For testing, let me run it immediately by clicking Backup now under Backup in the VM blade. Select date for retaining the recovery point.

View Backup items (virtual machine) on secondary region:
- From Azure portal, select recovery vault and click on your vault “asr-test”. Select backup items under protected items.
- You will see one virtual machine is available in primary region.

- Click on secondary region and view one virtual machine is available. This will show the secondary region location on right corner.
Restore virtual machine on secondary region
In this section we will restore the virtual machine backup to secondary region.
- From Azure portal, select recovery vault and click on your vault “asr-test”.
- Select backup items under protected items.
- You can view one virtual machine is available in primary and click on Azure virtual machine options and click on virtual machine name (azdemo-vm01).
- Click on restore to secondary region.

- Select restore point. Click select and choose appropriate restore point for restore.
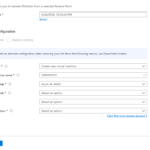
- Provide below settings:
- Restore type: create new virtual machine
- Virtual machine name: enter new name for VM in secondary region.
- Resource group: select previously created resource group in secondary region.
- Virtual network: select previously created virtual network in secondary region.
- Subnet: select subnet from selected virtual network in secondary region.
- Staging location: select storage account from previously created in secondary region.
6-restore VM- Click restore.
- Click backup jobs in recovery vault and click view jobs on secondary region.

- Click on job to view detailed info and status of restore.
Verify restored virtual machine in secondary region
In this section we will verify the restore by checking for the file we created on the server previously.
- Note, the restored virtual machine in the secondary region will have a new public ip address.
- Login to restored virtual machine via RDP and public IP address providing appropriate credentials.
- Verify that text file placed on C: \drive called “backup.txt” is available.
- Once we are happy with restored virtual machine, we can delete it.
- Once you are satisfied with the test, clean up all resources created for this demo.
Things to note:
- This feature can be used to restore virtual machine and individual disks to a secondary region.
- Due to delays in storage replication from primary to secondary, there will be latency in the backed-up data being available for a restore in the secondary region.
- Azure backup uses restore points based on a backup schedule (which is usually out of business hours and once in a day). Recovery plans are used in Site recovery based on defined RTO/RPO for individual virtual machine or resources with more recovery points of resources Azure backup data restoration is unlikely to meet customer specific RTO / RPO for disaster recovery scenarios. For DR based scenarios, use Azure site recovery with recovery plans.
- As Azure backup uses restore points based on a backup schedule that usually consists of one backup per day outside of business hours it may not satisfy your RPO due to the backup being up to 24 hours old or RTO due to longer restore time of a backup. In contrast, Azure SIte Recovery allows for more granular management via defined recovery plans tailored to your resources supporting more frequent recovery points via and faster recovery times via replication.
- If a virtual machine has static ip and restored VM will have dynamic ip address. Once it’s been restored, we can assign static ip address.
- The virtual network in the secondary region needs to be assigned uniquely and cannot be used for any other VMs . Even after deleting backup data, Site recovery vault uses soft delete and data will be retained for 14 days after deletion or stopped backup of VM

Santhosh has over 15 years of experience in the IT organization. Working as a Cloud Infrastructure Architect and has a wide range of expertise in Microsoft technologies, with a specialization in public & private cloud services for enterprise customers. My varied background includes work in cloud computing, virtualization, storage, networks, automation and DevOps.