

Containers and Kubernetes are the hottest topics in application modernization technologies. Let me explain the Kubernetes architecture and its components. This blog post is the second in a series that will be in three parts:
- Part 1: Introduction to Docker, Containers, and Kubernetes
- Part 2: Deep Dive into Kubernetes
- Part 3: Containers Services in Azure.
Kubernetes Architecture: Kubernetes follows a client-server architecture. A cluster is a set of grouped nodes. This way, even if one Node fails, your application is still accessible from the other nodes. Moreover, having multiple nodes helps in sharing the load as well. It’s possible to have a multi-master setup (for high availability), but by default, a single controller server acts as a controlling node and point of contact.
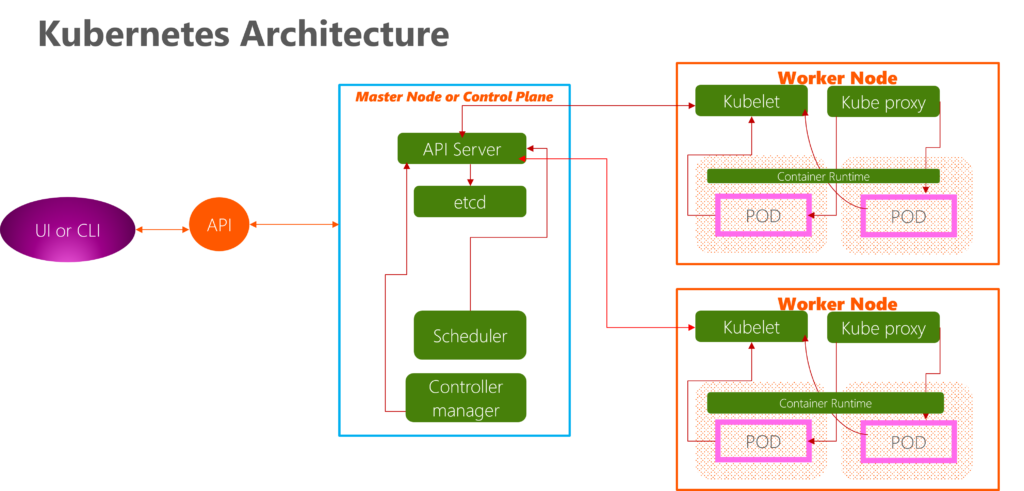
Each server in a Kubernetes cluster gets a role. There are two possible roles:
Control plane or Controller Node — Makes most of the necessary decisions and acts as the brains of the entire cluster. This can be a single server or a group of servers in larger projects. The Master is another node with Kubernetes installed and configured as a Master. The Master watches over the nodes in the cluster and is responsible for the actual orchestration of containers on the worker nodes. The controller server consists of various components, including a kube-apiserver, an etcd storage, a kube-controller-manager, a cloud-controller-manager, a kube-scheduler, and a DNS server for Kubernetes services.
To work with Kubernetes objects – whether to create, modify, or delete them – you’ll need to use the Kubernetes API. The controller server has the kube-apiserver, making it a master. When you use the kubectl command-line interface, the CLI makes the necessary Kubernetes API calls for you. “
Node — Responsible for running workloads. The control plane usually micromanages these servers and carries out various tasks following supplied instructions.
The control plane’s components make global decisions about the cluster (scheduling) and detect and respond to cluster events (for example, starting up a new pod when a deployment’s replicas field is unsatisfied). Control plane components can be run on any machine in the cluster. However, for simplicity, setup scripts typically start all control plane components on the same machine and do not run user containers on this machine.
Master Components:
- kube-apiserver: The API server is a component of the Kubernetes control plane that exposes the Kubernetes API. The API server is the front end of the Kubernetes control plane. The primary implementation of a Kubernetes API server is kube-apiserver. kube-apiserver is designed to scale horizontally—that is, it scales by deploying more instances. You can run several instances of kube-apiserver and balance traffic between those instances. Kubernetes API server is the central management entity that receives all REST requests for modifications (to pods, services, replication sets/controllers, and others), serving as a frontend to the cluster. Also, this is the only component communicating with the etcd cluster, ensuring data is stored in etcd and in agreement with the service details of the deployed pods.
2. etcd: Consistent and highly-available key value store used as Kubernetes’ backing store for all cluster data. A simple, distributed key-value storage stores the Kubernetes cluster data (such as the number of pods, their state, namespace, etc.), API objects, and service discovery details. It is only accessible from the API server for security reasons. etcd enables notifications to the cluster about configuration changes with the help of watchers. Notifications are API requests on each etcd cluster node to trigger information updates in the Node’s storage.
3. Kube-controller-manager: The controllers are the brain behind orchestration. They are responsible for noticing and responding when nodes, containers, or endpoints go down. The controllers make decisions to bring up new containers in such cases. It runs several distinct controller processes in the background (for example, the replication controller controls several replicas in a pod, and the endpoints controller populates endpoint objects like services and pods, and others) to regulate the cluster’s shared state and perform routine tasks. When a change in a service configuration occurs (for example, replacing the image from which the pods are running or changing parameters in the configuration yaml file), the controller spots the change and starts working towards the new desired state.
4. Cloud-controller-manager: It manages controller processes with dependencies on the underlying cloud provider (if applicable). For example, when a controller needs to check if a node was terminated or set up routes, load balancers, or volumes in the cloud infrastructure, all that is handled by the cloud-controller-manager.
5. Kube-scheduler: It helps schedule the pods (a co-located group of containers inside which our application processes are running) on the various nodes based on resource utilization. It reads the service’s operational requirements and schedules it on the best-fit Node.
Node (worker) components:
1. kubelet: The main service on a node, regularly taking in new or modified pod specifications (primarily through the kube-apiserver) and ensuring that pods and their containers are healthy and running in the desired state. This component also reports to the Master on the host’s health where it is running. By installing kubelet, the Node’s CPU, RAM, and storage become part of the broader cluster. It watches for tasks sent from the API Server, executes them, and reports back to the Master. It also monitors pods and reports to the control panel if a pod is not fully functional. Based on that information, the Master can decide how to allocate tasks and resources to reach the desired state.
2. Kube-proxy: A proxy service that runs on each worker node to deal with individual host subnetting and expose services to the external world. The kube-proxy ensures each Node gets its IP address and implements local tables and rules for routing and traffic load-balancing. It performs request forwarding to the correct pods/containers across the various isolated networks in a cluster.
Kubectl: A kubectl command is a line tool that interacts with kube-apiserver and sends commands to the controller node. Each command is converted into an API call.
3. Container runtime: The container runtime is the software responsible for running containers. The container runtime pulls images from a container image registry and starts and stops containers. Kubernetes supports container runtimes such as containerd, CRI-O, and any other implementation of the Kubernetes CRI (Container Runtime Interface).
Let’s start deep diving into each Kubernetes component.
- Component – POD: Pods are the atomic unit on the Kubernetes platform. When we create a Deployment on Kubernetes, that Deployment creates Pods with containers inside them (as opposed to creating containers directly). Each Pod is tied to the Node where it is scheduled and remains there until termination (according to restart policy) or deletion. In case of a Node failure, identical Pods are scheduled on other available Nodes in the cluster. Pods are the minor units in a Kubernetes cluster, encompassing one or more applications. Pods are generally used to manage an application instance. Containers are part of a larger object, which is the Pod. We can have one or multiple containers within a pod. Usually, each Pod has one IP. A pod can run multiple containers; all containers are started in parallel.
Pods that run a single container. The “one-container-per-Pod” model is the most common Kubernetes use case; in this case, you can think of a Pod as a wrapper around a single container; Kubernetes manages Pods rather than addressing the containers directly.
Pods that run multiple containers that need to work together. A Pod can encapsulate an application composed of multiple co-located containers that are tightly coupled and need to share resources. These co-located containers form a single cohesive unit of service. For example, one container serves data stored in a shared volume to the public, while a separate sidecar container refreshes or updates those files. The Pod wraps these containers, storage resources, and a temporary network identity together as a single unit.
A controller for the resource handles replication and rollout, and automatic healing in case of Pod failure. For example, if a Node fails, a controller notices that Pods on that Node have stopped working and creates a replacement Pod. The scheduler places the replacement Pod onto a healthy Node.
2. Component – Namespace
Namespace servers are the first level of isolation. They ensure a process running inside a container cannot see or affect operations outside the container. Kubernetes namespace allows you logically organise your resources into groups. You can have multiple namespaces inside a single Kubernetes cluster, and they are all logically isolated from each other. While provisioning a Kubernetes cluster, it will create a different default namespace to hold the default set of Pods, Services, and Deployments used by the cluster. The default namespace is: Kube-system, Kube-public, Kube-node-lease & Default.
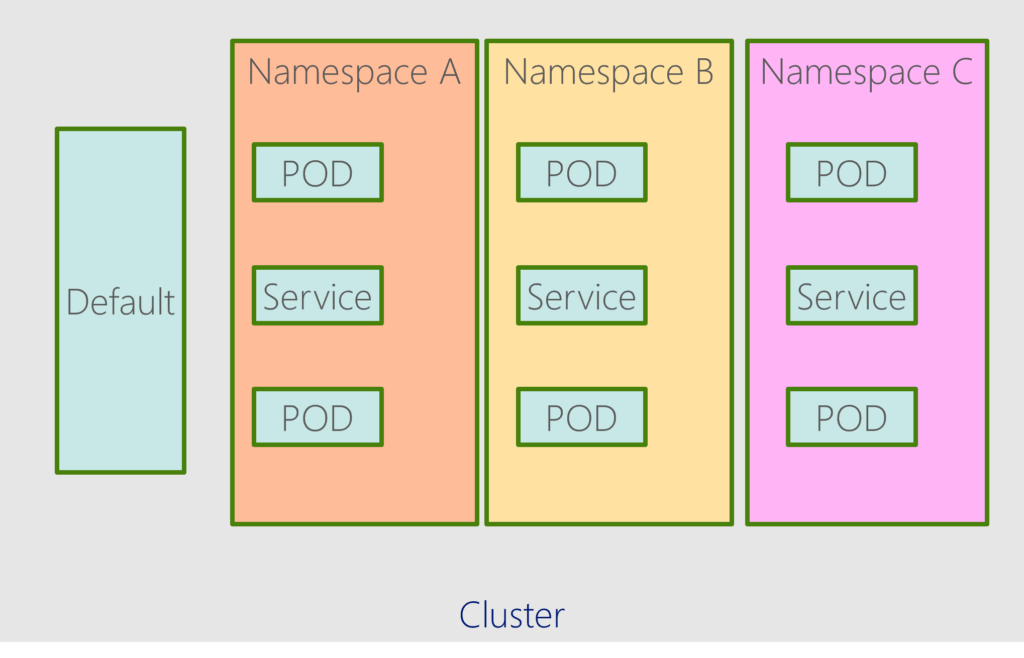
When we have a large set of Kubernetes resources running on our cluster, Kubernetes namespaces help organize them and allow you to group them based on the nature of the project. For example, separate namespaces can be created for different environments, such as development, staging, production, etc., for a project or an application.
3. Components – Labels and Selectors
Labels are key/value pairs attached to objects, such as pods. Labels can be used to organize and select subsets of objects. Labels can be attached to objects at creation time and subsequently added and modified at any time.
Labels are intended to specify identifying attributes of objects that are meaningful and relevant to users but do not directly imply semantics to the core system. Each object can have a set of key/value labels defined. Each Key must be unique for a given object.
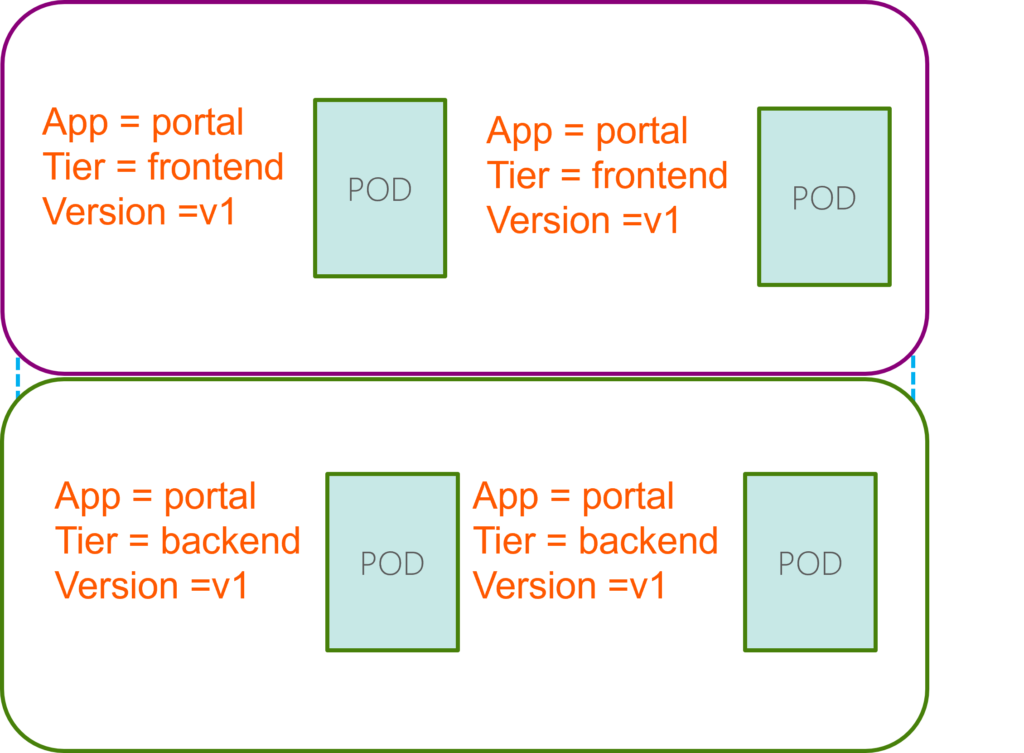
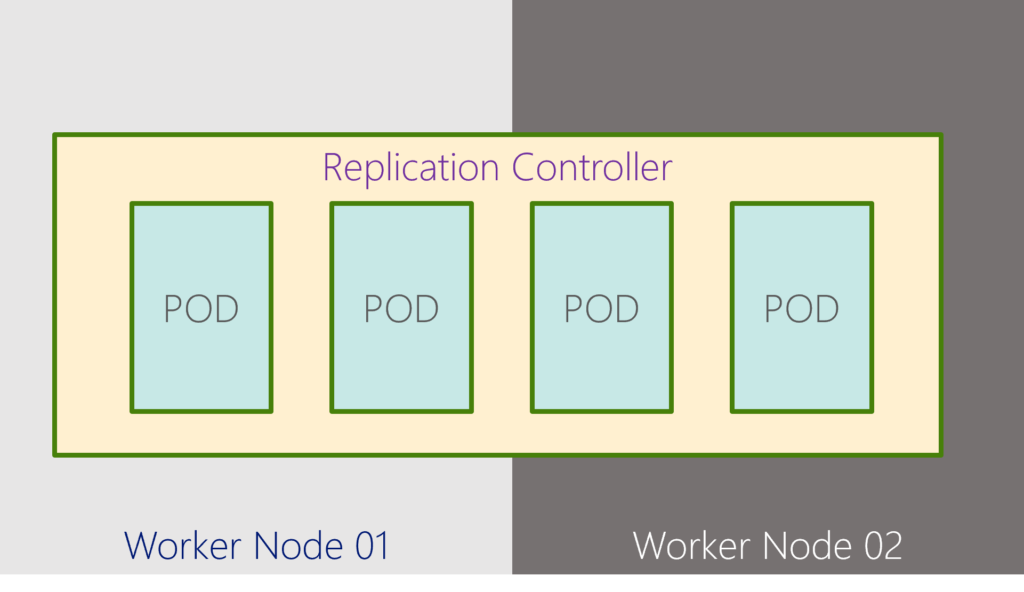
When do we label our PODs and objects in Kubernetes? Let us look at a simple scenario. Say we deployed five instances of our frontend web application as five PODs. We want to create a replication controller or replica set to ensure we have five active PODs at any time. And YES, that is one of the use cases of replica sets.
Now, how do the replicas know which pods to monitor? There could be 1000s of other PODs in the cluster running different applications. This is where labeling our PODs during creation comes in handy. We could now provide these labels as a filter for replicas. Under the selector section, we use the match Labels filter and provide the same label we used while creating the pods. This way, the replica knows which pods to monitor.
4. Components – Replica Set (Controller)
Controllers are the brain behind Kubernetes. They are processes that monitor Kubernetes objects and respond accordingly. The replication controller helps us run multiple instances of a single POD in the Kubernetes cluster, thus providing High Availability. ReplicaSet is the next-generation Replication Controller that supports the new set-based label selector. Deployment mainly uses it to orchestrate pod creation, deletion, and updates.
The Replication Controller ensures that the desired number of pods matches its label selector and is operational. The replication controller helps us run multiple instances of a single POD in the Kubernetes cluster, thus providing High Availability. Replication Controller and Replica Set. Both have the same purpose, but they are not the same. Replication Controller is the older technology that Replica Set is replacing. A replica set is the new recommended way to set up replication.
The replica set use cases are :
- Even if you have a single POD, the replication controller can help by automatically bringing up a new POD when the existing one fails. Thus, the replication controller ensures the specified number of PODs are always running, even if it’s just one or 100s.
- Another reason we need a replication controller is to create multiple PODs to share the load across them. When the number of users increases, we deploy additional POD to balance the load across the two pods.
5. Components – Deployment
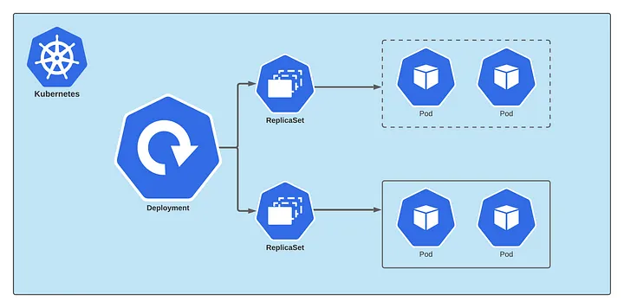
Deployment is one of the mechanisms for handling workloads (applications) in Kubernetes. Kubernetes Deployment Controller manages it. A Deployment is a higher-level concept that works ReplicaSets and provides declarative updates to Pods and many other valuable features. Therefore, we recommend using Deployments instead of directly using ReplicaSets, unless you require custom update orchestration or don’t require updates.
Deployment is an abstraction over ReplicaSet. Under the hood, Deployment creates a ReplicaSet, which makes pods on our cluster. As per the name, ReplicaSet is used for managing the replicas of our pods. The deployment allows us to upgrade the underlying instances seamlessly using rolling updates, undo changes, and pause and resume changes to deployments.
6. Components – Deployment- Updates and Rollback
A rollout is a process of gradually deploying or upgrading application containers. Rollback Deployment means returning to the previous deployment instance if there is some issue with the current deployment. When you first create a deployment, it triggers a rollout. A new rollout creates a new Deployment revision. Let’s call it revision 1. In the future, when the application is upgraded – meaning when the container version is updated to a new one – a new rollout is triggered, and a new deployment revision is created named Revision 2. This helps us keep track of the changes made to our deployment and enables us to roll back to a previous deployment version if necessary.
A Deployment’s rollout is triggered if and only if the Deployment’s Pod template (that is, .spec.template) is changed, for example, if the labels or container images of the template are updated. Other updates, such as scaling the Deployment, do not trigger a rollout.
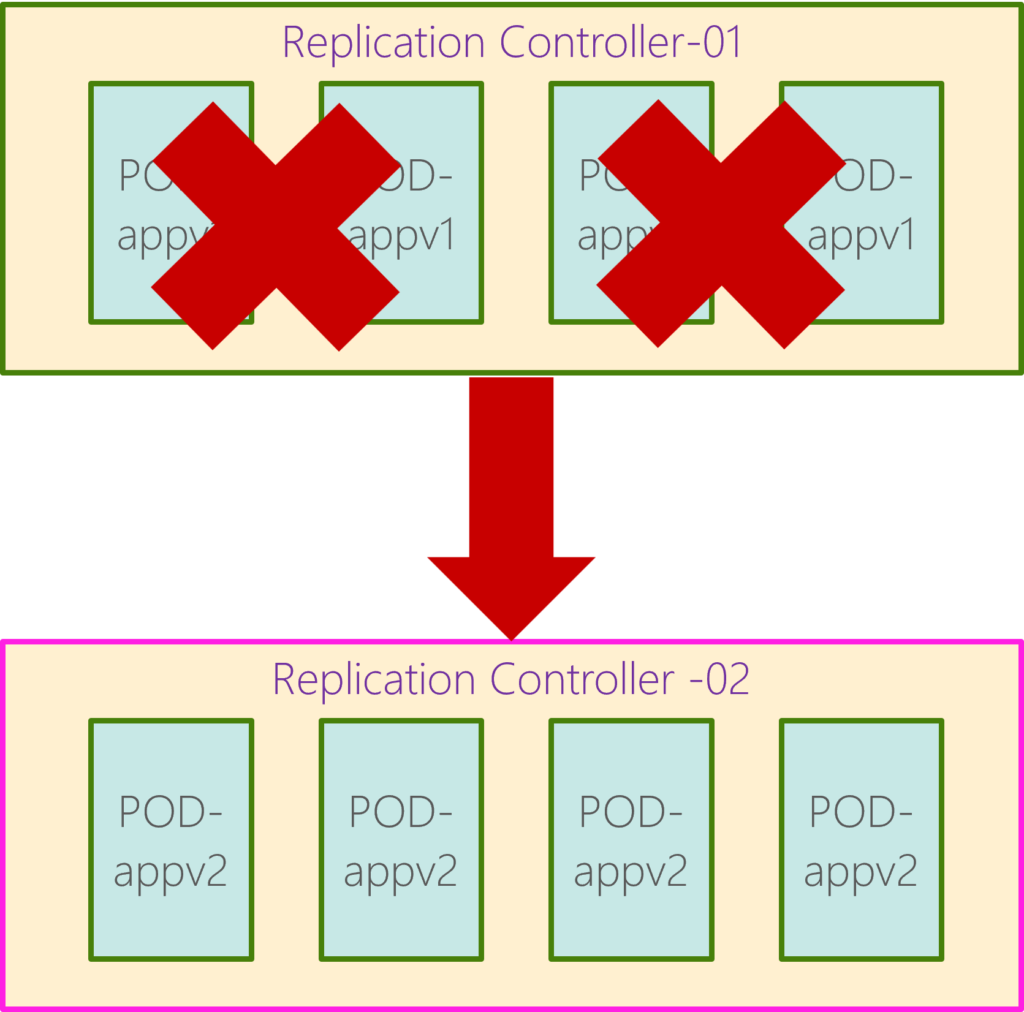
Upgrades: When creating a new deployment, say to deploy two replicas. If first creates a replica set automatically, which in turn creates the number of pods required to meet the number of replicas.
When we upgrade our application, the Kubernetes deployment object creates a new replica set under the hoods and starts deploying the containers there. At the same time, taking down the pods from the old replica set follows a rolling update strategy.
Rollback: Rollback a Deployment; when the Deployment is unstable, such as crash looping. The Deployment’s rollout history is kept in the system by default so you can roll back anytime. For instance, once you upgrade your application, you realize something isn’t very suitable. Something’s wrong with the new build version you used to upgrade. So you would like to roll back your update. Kubernetes deployments allow you to roll back to a previous revision. To undo a change, run the command kubectl rollout undo followed by the deployment name. The deployment will then destroy the PODs in the new replica set and bring the older ones up in the old replica set. And your application is back to its older format.
When you compare the output of the kubectl and get the replica sets command before and after the rollback, you will be able to notice this difference. Before the rollback, the first replica set had 0 PODs, and the new replica set had 5 PODs, and this is reversed after the rollback is finished.
7. Components – Deployment Strategy
There are two use deployments strategies:
- Recreate: When multiple replicas of web application instances are deployed, one way to upgrade these to a newer version is to destroy all of these and then create newer versions of application instances. The problem is that when the older version is down and the newer version is up, the application is down and inaccessible to the users. This strategy is called recreate strategy, not the actual deployment strategy.
- Rolling update: In the second strategy, Kubernetes doesn’t destroy all the instances simultaneously. Instead, we take down the older version and bring up a newer version one by one. This way, the application never goes down, and the upgrade is seamless. This is called the rollout strategy. If we do not specify a strategy while creating a deployment, by default, it assumes the deployment strategy as a rolling update. The rolling update is the default deployment strategy.
8. Components – Network policy
Network policies provide micro-segmentation for pods just like Network Security Groups (NSGs) provide micro-segmentation for VMs. You can use labels to select a group of pods and define a list of ingress and egress rules to filter traffic to and from these pods.
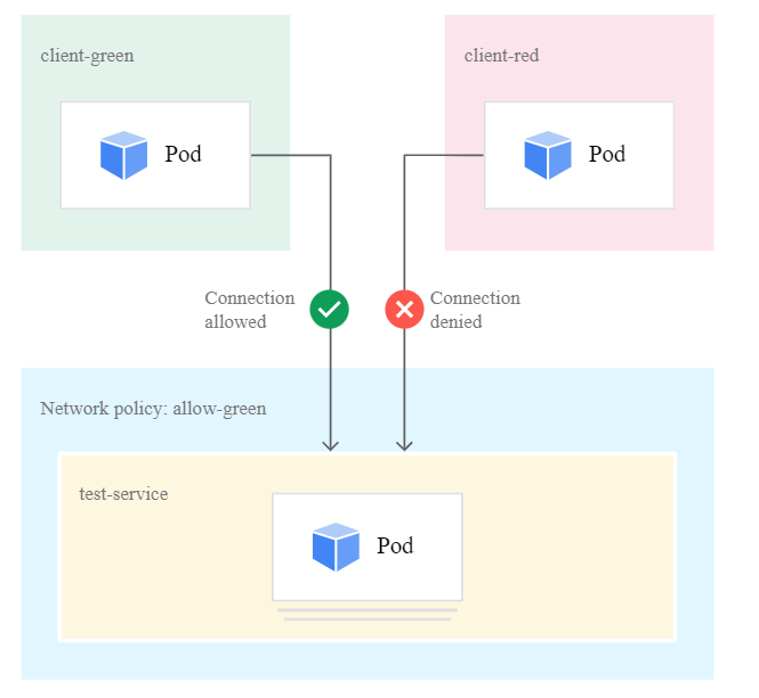
By default, a pod is non-isolated for egress; all outbound connections are allowed. By default, a pod is non-isolated for ingress; all inbound connections are allowed. By default, if no policies exist in a namespace, all ingress and egress traffic is allowed to and from pods.
9. Components – Services
In Kubernetes, a Service exposes a network application running as one or more Pods in your cluster. Pods are not constant. One of the best features Kubernetes offers is that non-functioning pods get replaced by new ones automatically. However, these new pods have a different set of IPs. It can lead to processing issues and IP churn as the IPs no longer match. If left unattended, this property would make pods highly unreliable. Services are introduced to provide reliable networking by bringing stable IP addresses and DNS names to the unstable world of pods. By controlling traffic coming and going to the pod, a Kubernetes service provides a stable networking endpoint – a fixed IP, DNS, and port. Through a service, any pod can be added or removed without the fear that basic network information would change in any way. There are three different types of services:
- NodePort: The Kubernetes service is an object just like PODs, Replicaset, or Deployments we worked with before. One of its use cases is to listen to a port on the Node and forward requests on that port to a port on the POD running the web application. This type of service is known as a NodePort service because the service listens to a port on the Node and forwards requests to PODs.

- ClusterIP: The service creates a virtual IP inside the cluster to enable communication between different services, such as frontend and back-end servers.
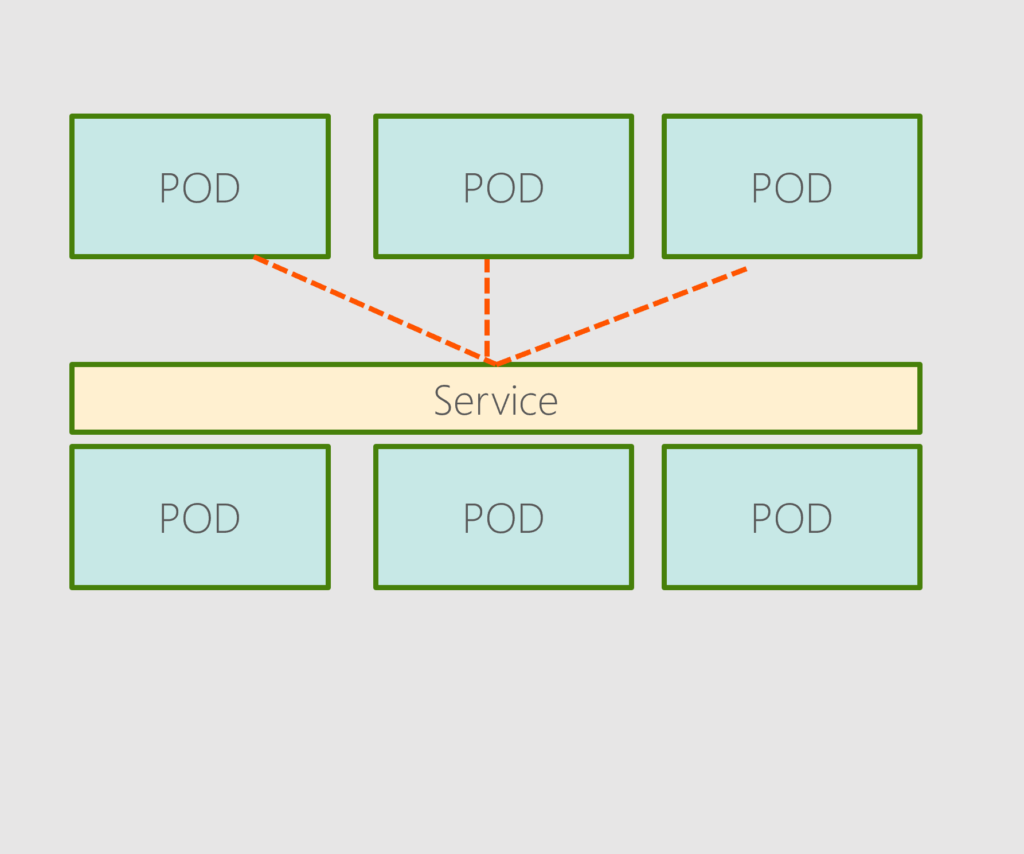
A Kubernetes service can help us group these PODs and provide a single interface to access the PODs in a group. For example, a service created for the backend PODs will help group all the backend PODs and provide a single interface for other PODs to access this service. The requests are forwarded to one of the PODs under the service randomly.
This enables us to quickly and effectively deploy a microservices-based application on the Kubernetes cluster. Each layer can scale or move as required without impacting communication between the various services. Each service gets an IP and name assigned to it inside the cluster, and that is the name that other PODs should use to access the service. This type of service is known as ClusterIP.
- LoadBalancer: This service type creates load balancers in various Cloud providers like AWS, GCP, Azure, etc., to expose our application to the Internet. The Cloud provider will provide a mechanism for routing the traffic to the services. The most common example usage of this type is for a website or a web app. We could leverage the native load-balancing functionalities of the cloud platform to set this up. Again you don’t have to set that up manually; Kubernetes sets it up for you. Kubernetes has built-in integration with supported cloud platforms.
That is the end of understanding Kubernetes architecture and its components. The last part of this series will be published sooner.

Santhosh has over 15 years of experience in the IT organization. Working as a Cloud Infrastructure Architect and has a wide range of expertise in Microsoft technologies, with a specialization in public & private cloud services for enterprise customers. My varied background includes work in cloud computing, virtualization, storage, networks, automation and DevOps.